Edge ML Plugin
The plugin takes a video frame from a camera or stream , sends that to edgeml cluster running somewhere else. The Edge ML cluster returns a response in the form of json which contains information about detected objects, their bounding boxes and confidence score. This information is overlayed on the frame and saved onto disk in the form of images. The results are also streamed on a browser.
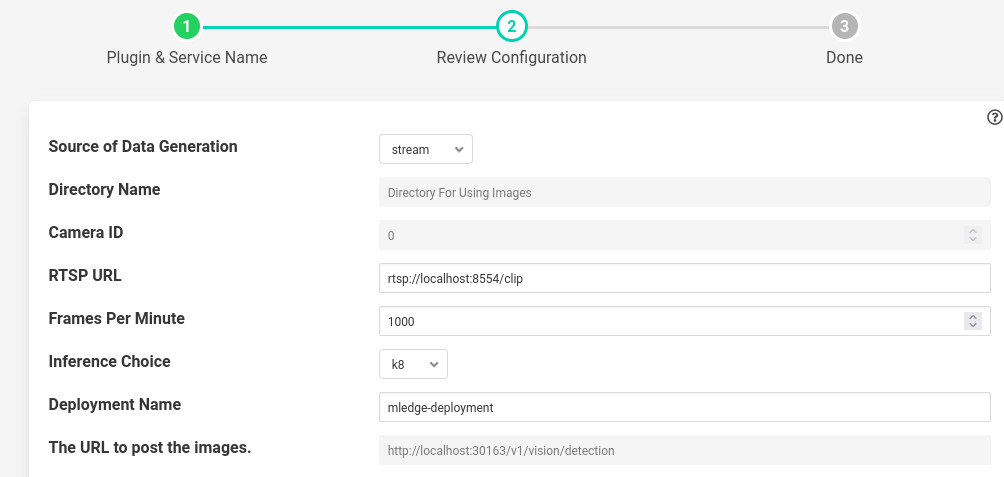
- ‘source’: type: enumeration default: ‘stream’:
Source of data being generated. Could be camera if camera is attached, stream if rtsp stream is to be used and directory if we have a directory of images.
- ‘sourceDirName’: type: string default: ‘Directory For Using Images’:
If source is directory then the directory which contains images.
- ‘cameraId’: type: integer default: 0:
If camera is to be used then enter the device id of camera. If you use 0 then the following command should be successful.
v4l2-ctl –list-formats-ext –device /dev/video0 .
In case you dont get output use camera id 1, 2 and so on.
- ‘rtspUrl’: type: string default: rtsp://localhost:8554/clip:
If source is stream, then enter the url of the rtsp stream.
- ‘fpm’: type: integer default: ‘1000’:
No of frames to process in a minute.
- ‘inferenceChoice’: type: enumeration default: ‘k8’:
If the edgeml cluster is running inside microk8’s on the same machine then use k8 or use URL if you want to send inference request to some other machine or some k8 cluster other than microk8’s.
- ‘deploymentName’: type: string default: ‘mledge-deployment’:
If inferenceChoice is k8 then the name of the deployment inside microk8’s. The plugin will pick the ip and port from the deployment name itself.
- ‘restUrl’: type: string default: http://localhost:30163/v1/vision/detection:
If inferenceChoice is URL, then the URL where the post request will be sent.
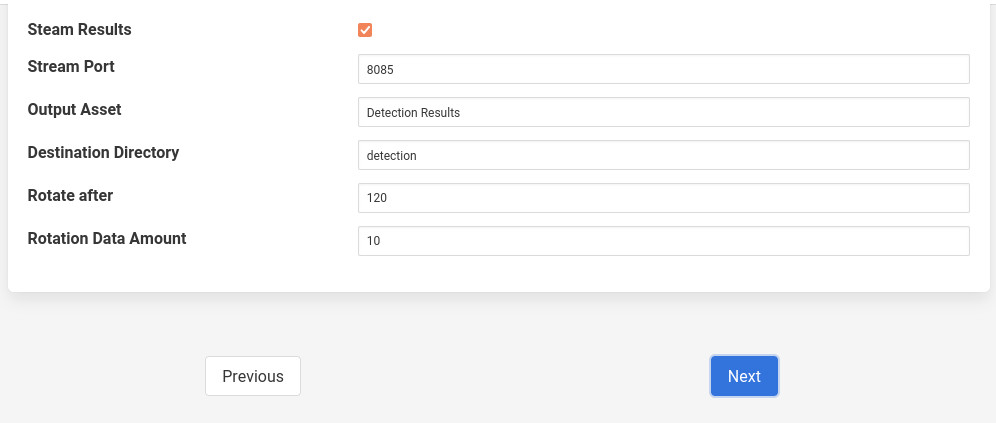
- ‘streamResults’: type: boolean default: ‘true’:
Whether to stream detection results over HTTP(s)
- ‘streamPort’: type: integer default: ‘8085’:
The port over which we can display detection results in browser.
- ‘outputAsset’: type: string default: ‘Detected Results’:
The name of asset which contains detected results.
- ‘destinationDir’: type: string default: ‘detection’:
The directory where resultant images will be stored.
- ‘rotateAfterMinutes’: type: integer default: ‘120’:
The amount of time (in minutes) after which source images (with bounding boxes) are deleted”.
- ‘rotateDataMinutes’: type: integer default: ‘10’:
The amount of jpeg files (with bounding boxes) in minutes to be rotated.
Installation
Part 1: Get the video feed
There are two ways to get the video feed.
- Camera
- To see the supported configuration of the camera run the following command.
Above example uses Camera ID 0 to indicate use of /dev/video0 device, please use the applicable value for your setup
Network RTSP stream
To create a network stream follow the following steps
Install vlc
$ sudo add-apt-repository ppa:videolan/master-daily
$ sudo apt update
$ apt show vlc
$ sudo apt install vlc qtwayland5
$ sudo apt install libavcodec-extra
Download some sample files from here.
$ git clone https://github.com/intel-iot-devkit/sample-videos.git
Either stream a file using the following
$ vlc <name_of_file>.mp4 --sout '#gather:transcode{vcodec=h264,vb=512,scale=Auto,width=640,height=480,acodec=none,scodec=none}:rtp{sdp=rtsp://<ip_of_machine_steaming>:8554/clip}' --no-sout-all --sout-keep --loop --no-sout-audio --sout-x264-profile=baselineNote : fill the <ip_of_the_machine> with ip of the machine which will be used to stream video. Also fill <name_of_file> with the name of mp4 file.
You can also stream from a camera using the following
$ vlc v4l2:///dev/video<index_of_video_device> --sout '#gather:transcode{vcodec=h264,vb=512,scale=Auto,width=<supported_width_of_camera_image>,height=<supported_height_of_camera_image>,acodec=none,scodec=none}:rtp{sdp=rtsp://<ip_of_the_machine>:8554/clip}' --no-sout-all --sout-keep --no-sout-audio --sout-x264-profile=baselineFill the following :
<index_of_video_device> The index with which you ran the v4l2 command mentioned above. for example video0.
<supported_height_of_camera_image> Height you get when you ran v4l2 command mentioned above. For example Discrete 640x480. Here 480 is height.
<supported_width_of_camera_image> Width you get when you ran v4l2 command mentioned above. For example Discrete 640x480. Here 640 is width.
<ip_of_the_machine> ip of the machine which will be used to stream video.