Buffering & Storage
One of the micro-services that makes up the core of a FogLAMP implementation is the storage micro-service. This is responsible for
storing the configuration of FogLAMP
buffering the data read from the south
maintaining the FogLAMP audit log
persisting the state of the system
The storage service is configurable, like other services within FogLAMP and uses plugins to extend the functionality of the storage system. These storage plugins provide the underlying mechanism by which data is stored within FogLAMP. FogLAMP can make use of either one or two of these plugins at any one time. If a single plugin is used then this plugin provides the storage for all data. If two plugins are used, one will be for the buffering of readings and the other for the storage of the configuration.
As standard FogLAMP comes with 3 storage plugins
SQLite: A plugin that can store both configuration data and the readings data using SQLite files as the backing store. The plugin uses multiple SQLite database to store different assets, allowing for high bandwidth data at the expense of limiting the number of assets that a single instance can ingest.
SQLiteLB: A plugin that can store both configuration data and the readings data using SQLite files as the backing store. This version of the SQLite plugin uses a single readings database and is better suited for environments that do not have very high bandwidth data. It does not limit the number of distinct assets that can be ingested.
PostgreSQL: A plugin that can store both configuration and readings data which uses the PostgreSQL SQL server as a storage medium.
SQLiteMemory: A plugin that can only be used to store reading data. It uses SQLite’s in memory storage engine to store the reading data. This provides a high performance reading store however capacity is limited by available memory and if FogLAMP is stopped or there is a power failure the buffered data will be lost.
The default configuration uses the SQLite disk based storage engine for both configuration and reading data
Configuring The Storage Plugin
Once installed the storage plugin can be reconfigured in much the same way as any FogLAMP configuration, either using the API or the graphical user interface to set the storage engine and its options.
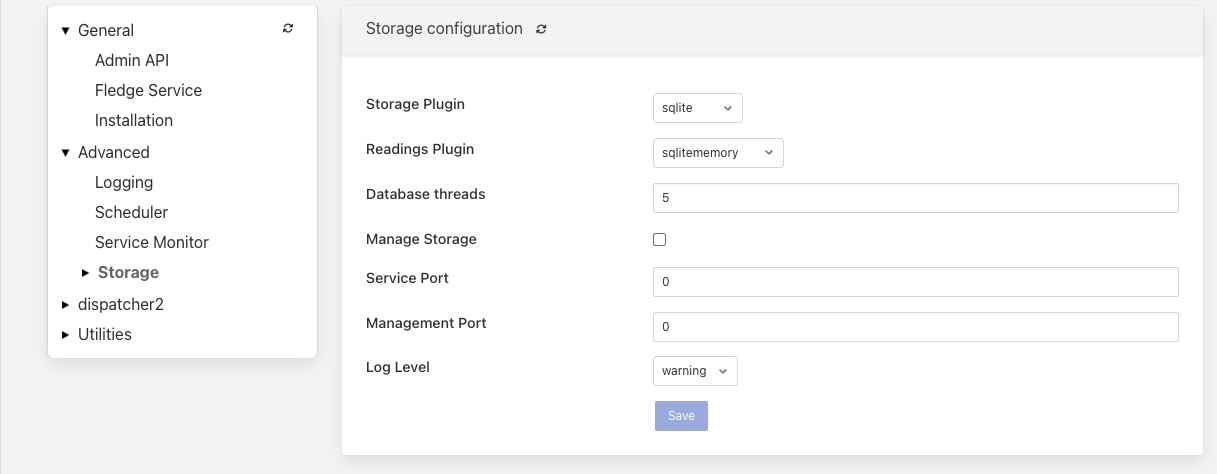
Using the user interface to configuration the storage, select the Configuration item in the left hand menu bar.
In the category category tree select Advanced and under that select Storage.
To change the storage plugin to use for both configuration and readings enter the name of the new plugin in the Storage Plugin entry field. If Readings Plugin is left empty then the storage plugin will also be used to store reading data. The default set of plugins installed with FogLAMP that can be used as Storage Plugin values are:
sqlite - the SQLite file based storage engine.
postgres - the PostgreSQL server.
Note
The PostgreSQL server is not installed by default when FogLAMP is installed and must be installed before it can be used. See Installing A PostgreSQL Server.
The Readings Plugin may be set to any of the above and may also be set to use the SQLite In Memory plugin by entering the value sqlitememory into the configuration field.
The Storage API threads field allows for the number of threads used by the Storage service API for handling incoming requests to be tuned.
The Worker thread pool is used for executing operations against the readings data with FogLAMP. The number of threads in this thread pool is controlled via this setting. Increasing the thread pool size will increase the number of operations the can be executed in parallel, however care should be exercised as increasing this will increase any contention issues within the storage layer and will become counter productive once the storage plugin is overloaded.
The Manage Storage option is only used when the database storage uses an external database server, such as PostgreSQL. Toggling this option on causes FogLAMP to start as stop the database server when FogLAMP is started and stopped. If it s left off then FogLAMP will assume the database server is running when it starts.
The Management Port and Service Port options allow fixed ports to be assigned to the storage service. These settings are for debugging purposes only and the values should be set to 0 in normal operation.
Note
Additional storage engines may be installed to extend the set that is delivered with the standard FogLAMP installation. These will be documented in the packages that provide the storage plugin.
Storage plugin configurations are not dynamic and FogLAMP must be restarted after changing these values. Changing the plugin used to store readings will not cause the data in the previous storage system to be migrated to the new storage system and this data may be lost if it has not been sent onward from FogLAMP.
If selecting the PostgreSQL storage engine then PostgreSQL must be installed and running with a foglamp user created in order for FogLAMP to start successfully.
SQLite Plugin Configuration
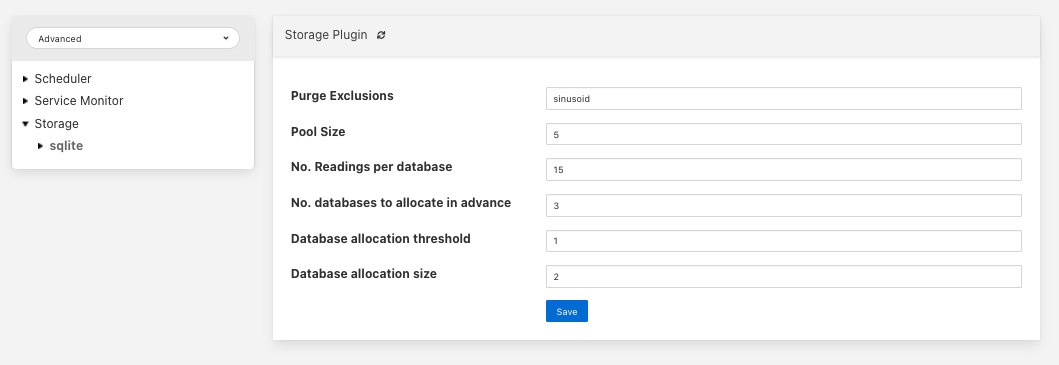
The SQLite storage engine has further options that may be used to configure its behavior. To access these configuration parameters click on the sqlite option under the Storage category in the configuration page.
|
Many of these configuration options control the performance of SQLite and it is important to have some background on how readings are stored within SQLite. The plugin is designed to allow greater ingests rates in situations where multiple different assets are being ingested by a single instance.
The storage plugin stores readings for each distinct asset in a table for that asset. These tables are stored within a database, however the SQLite database engine will lock an entire database to insert into any table within that database. In order to improve concurrency, multiple databases are used within the storage plugin. A set of parameters are used to define how these tables and databases are used.
Note
SQLite has a limitation on the number of databases that can be attached to a single process. Therefore we can not create an unlimited number of databases and attach them.
Once the tables within all the databases have been assigned to a particular asset, any new assets ingested will be inserted into an overflow tables that contains multiple assets. There is one overflow table per database within the process. The impact of this is that once the total number of distinct assets exceeds the number of tables allocated the gain in performance from using multiple tables in multiple databases start to diminish.
Pool Size: The number of connections to create in the database connection pool.
No. Readings per database: This option control how many assets can be stored in a single database. Each asset will be stored in a distinct table within the database. Once all tables within a database are allocated the plugin will use more databases to store further assets.
No. databases allocate in advance: This option defines how many databases are create initially by the SQLite plugin.
Database allocation threshold: The number of unused databases that must exist within the system. Once the number of available databases falls below this value the system will begin the process of creating extra databases.
Database allocation size: The number of databases to create when the above threshold is crossed. Database creation is a slow process and hence the tuning of these parameters can impact performance when an instance receives a large number of new asset names for which it has previously not allocated readings tables.
Purge Exclusions: This option allows the user to specify that the purge process should not be applied to particular assets. The user can give a comma separated list of asset names that should be excluded from the purge process. Note, it is recommended that this option is only used for extremely low bandwidth, lookup data that would otherwise be completely purged from the system when the purge process runs.
Vacuum Interval: The interval in hours between running a database vacuum command to reclaim space. Setting this too high will impact performance, setting it too low will mean that more storage may be required for longer periods.
PostgreSQL Plugin Configuration
FogLAMP supports PostgreSQL as a storage solution for both configuration and reading data. It can be used to store either one or both types of data, or just one in combination with another storage plugin.
Note
PostgreSQL is not installed as part of the installation of FogLAMP. If you wish to make use of the PostgreSQL storage plugin you may need to install PostgreSQL on the FogLAMP host or another host that FogLAMP can communicate with. Installing PostgreSQL in both these configuration is covered in the section, PostgreSQL Installation.
The PostgreSQL storage engine has further options that may be used to configure its behavior. To access these configuration parameters click on the postgres option under the Storage category in the configuration page.
|
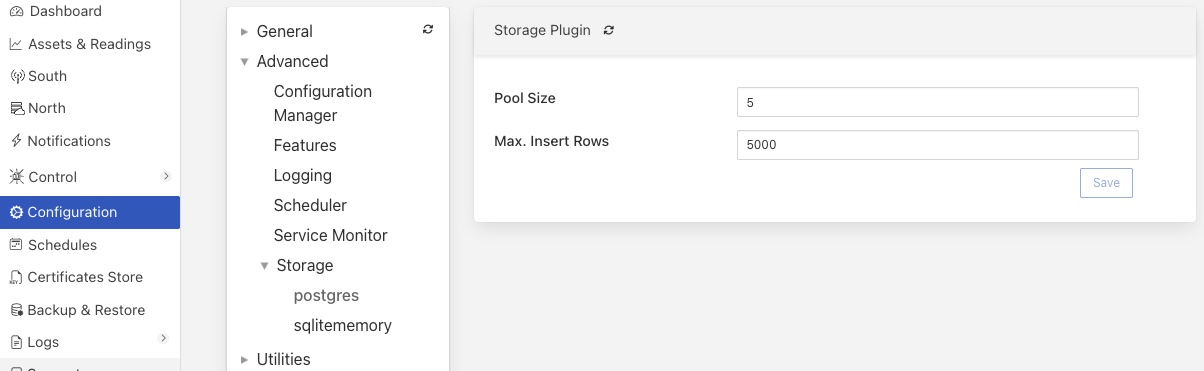
There are a number of configuration items that can be used to tune the performance of the PostgeSQL storage plugin.
Pool Size: The number of connections to create in the database connection pool.
Max. Insert Rows: The maximum number of readings that will be inserted within a single SQL statement.
PostgreSQL Installation
PostgreSQL may be installed locally on the same Linux host as FogLAMP or remotely on a separate host. This option to install PostgreSQL on a separate host makes it an ideal choice for containerised environments, where a stateless FogLAMP installation is a common goal. This allows all configuration state and buffered readings can held outside of the FogLAMP container, in a separate PostgreSQL container.
Note
Some state, such as scripts, may need to be stored outside the database. These will also need to be managed in order to achieve a truly stateless FogLAMP installation in all cases.
Installing A PostgreSQL Server
The precise commands needed to install a PostgreSQL server vary for system to system, in general a packaged version of PostgreSQL is best used. These are often available within the standard package repositories for your system.
Ubuntu Install
On Ubuntu or other apt based distributions the command to install PostgreSQL would be:
sudo apt install -y postgresql postgresql-client
Now, make sure that PostgreSQL is installed and running correctly:
sudo systemctl status postgresql
Before you proceed, you must create a PostgreSQL user that matches your Linux user. Supposing that user is <foglamp_user>, type:
sudo -u postgres createuser -d <foglamp_user>
The -d argument is important because the user will need to create the FogLAMP database.
A more generic command is:
sudo -u postgres createuser -d $(whoami)
Red Hat Install
On Red Hat or other yum based distributions to install postgres:
Add PostgreSQL YUM Repository to your System
sudo yum install -y https://download.postgresql.org/pub/repos/yum/reporpms/EL-9-x86_64/pgdg-redhat-repo-latest.noarch.rpm
Check whether PostgreSQL 13 is available using the command shown below
sudo yum search -y postgresql13
Once you have confirmed that PostgreSQL 13 repositories are available on your system. Then, you can proceed to install PostgreSQL 13
sudo yum install -y postgresql13 postgresql13-server
Before using the PostgreSQL server, you need to first initialize the database service using the command
sudo /usr/pgsql-13/bin/postgresql-13-setup initdb
You can then proceed to start the database server as follows
sudo systemctl enable --now postgresql-13
Confirm if the just started service above is running by checking its status using the command
sudo systemctl status postgresql-13
Next, you must create a PostgreSQL user that matches your Linux user.
sudo -u postgres createuser -d $(whoami)
Note
The example above is based on the use of PostgreSQL version 13, this is the latest verified version at the time of writing. Use of later versions should not cause any problems should version 13 not be available for your platform or there is a local requirement to use a different version. Likewise older version can be used, FogLAMP has been tested using version 9 and later.
Using a Remote PostgreSQL Server
Follow the steps below to set up PostgreSQL on a remote machine and enable secure network connections to the PostgreSQL server.
Install PostgreSQL on the remote machine
Refer to the section Installing A PostgreSQL Server for detailed PostgreSQL installation instructions.
Configure PostgreSQL to allow network connections
By default, PostgreSQL only listens for connections on the local machine. To allow access over the network, from other hosts or containers, you need to modify the PostgreSQL configuration file, postgresql.conf.
Open the configuration file for editing:
sudo nano /etc/postgresql/<version>/main/postgresql.confReplace <version> with the installed PostgreSQL version (e.g. 12, 14, etc.).
Locate the following line in the configuration file:
#listen_addresses = 'localhost'Update the line to:
listen_addresses = '*'This setting instructs PostgreSQL to listen for connections on all available network interfaces.
Note
In production environments, avoid using ‘*’ unless absolutely necessary. Instead, restrict connections to specific IP addresses to enhance security.
Save the file and exit the editor.
Update client authentication rules
PostgreSQL uses the pg_hba.conf file (Host-Based Authentication) to control how clients authenticate and connect to the database. To allow network connections, you need to update the rules in this file.
Open the pg_hba.conf file for editing:
sudo nano /etc/postgresql/<version>/main/pg_hba.confAdd the following entry at the end of the file:
host all all 0.0.0.0/0 trustEach entry in the file consists of five fields, these fields are described below:
Field
Description
Example
Connection
This specifies that the rule applies to TCP/IP connections.
host
Database
The name of the database to which the rule is applied. The reserve name all applies the rule to all databases.
all
User
The user to which the rule applies. The reserved username of all may be used to apply the rule to all users.
all
Address
The network mask which defines the sub-networks from which connections are allowed. The example provided permits connections from all IPv4 addresses. For improved security replace this with a specific network mask (e.g. 192.168.1.0/24 limits connections to just those from the network 192.168.1.xxx). Either IPV4 or IPV6 network masks may be supplied.
0.0.0.0/0
Authentication Method
The authentication method to be used. The trust method disables password authentication. While trust is convenient for testing, it is not recommended for production environments. For secure authentication in production, use md5 or scram-sha-256.
trust
An example entry for use in a production environment, might be as follows:
host all all 0.0.0.0/0 md5Note
Security can be further strengthened by enforcing SSL encryption on connections. This is done by specifying a connection type of hostssl rather than host in the configuration record. You must also enable SSL support in PostgreSQL, refer to the PostgreSQL documentation for settings required for this.
Save the file and exit the editor.
Restart the PostgreSQL Service
In order for the changes to take affect it is necessary to restart PostgreSQL.
Note
Once the configuration is complete, ensure that the machine’s firewall settings allow incoming connections to PostgreSQL’s default port (5432).
Setting Up PostgreSQL Client on the Local Machine
This section explains how to set up the PostgreSQL client on the machine running FogLAMP.
Install PostgreSQL Client
The PostgreSQL client tools are required to allow FogLAMP to interact with a remote PostgreSQL server. Install the postgresql-client package using your system’s package manager.
Export PostgreSQL Environment Variables
Configure environment variables to specify the connection details for the PostgreSQL server. These variables ensure that FogLAMP can communicate with the server seamlessly.
The environment variables include the host, user, password and optionally port, for the PostgreSQL server.
export PGHOST=<host_ip_address>
export PGUSER=<postgres_user_name>
export PGPASSWORD=<postgres_user_password>
export PGPORT=<postgres_port>
These may be set in the login script run by the user who runs FogLAMP or if using a container, you may pass these into the FogLAMP container at startup using the -e flag to the container.
The description of each of the environment variables supported is shown below.
Environment Variable
Description
PGHOST
The IP address or hostname of the PostgreSQL server.
PGUSER
The username for the PostgreSQL database (e.g. postgres).
PGPASSWORD
The password for the specified user.
PGPORT
An optional environment variable that can be specified if the PostgreSQL installation is not listening on the default PostgreSQL port of 5432.
Storage Management
FogLAMP manages the amount of storage used by means of purge processes that run periodically to remove older data and thus limit the growth of storage use. The purging operations are implemented as FogLAMP tasks that can be scheduled to run periodically. There are two distinct tasks that are run
purge: This task is responsible for limiting the readings that are maintained within the FogLAMP buffer.
system purge: This task limit the amount of system data in the form of logs, audit trail and task history that is maintained.
Purge Task
The purge task is run via a scheduled called purge, the default for this schedule is to run the purge task every hour. This can be modified via the user interface in the Schedules menu entry or via the REST API by updating the schedule.
The purge task has two metrics it takes into consideration, the age of the readings within the system and the number of readings in the system. These can be configured to control how much data is retained within the system. Note however that this does not mean that there will never be data older than specified or more rows than specified as purge runs periodically and between executions of the purge task the readings buffered will continue to grow.
The configuration of the purge task can be found in the Configuration menu item under the Utilities section.
|
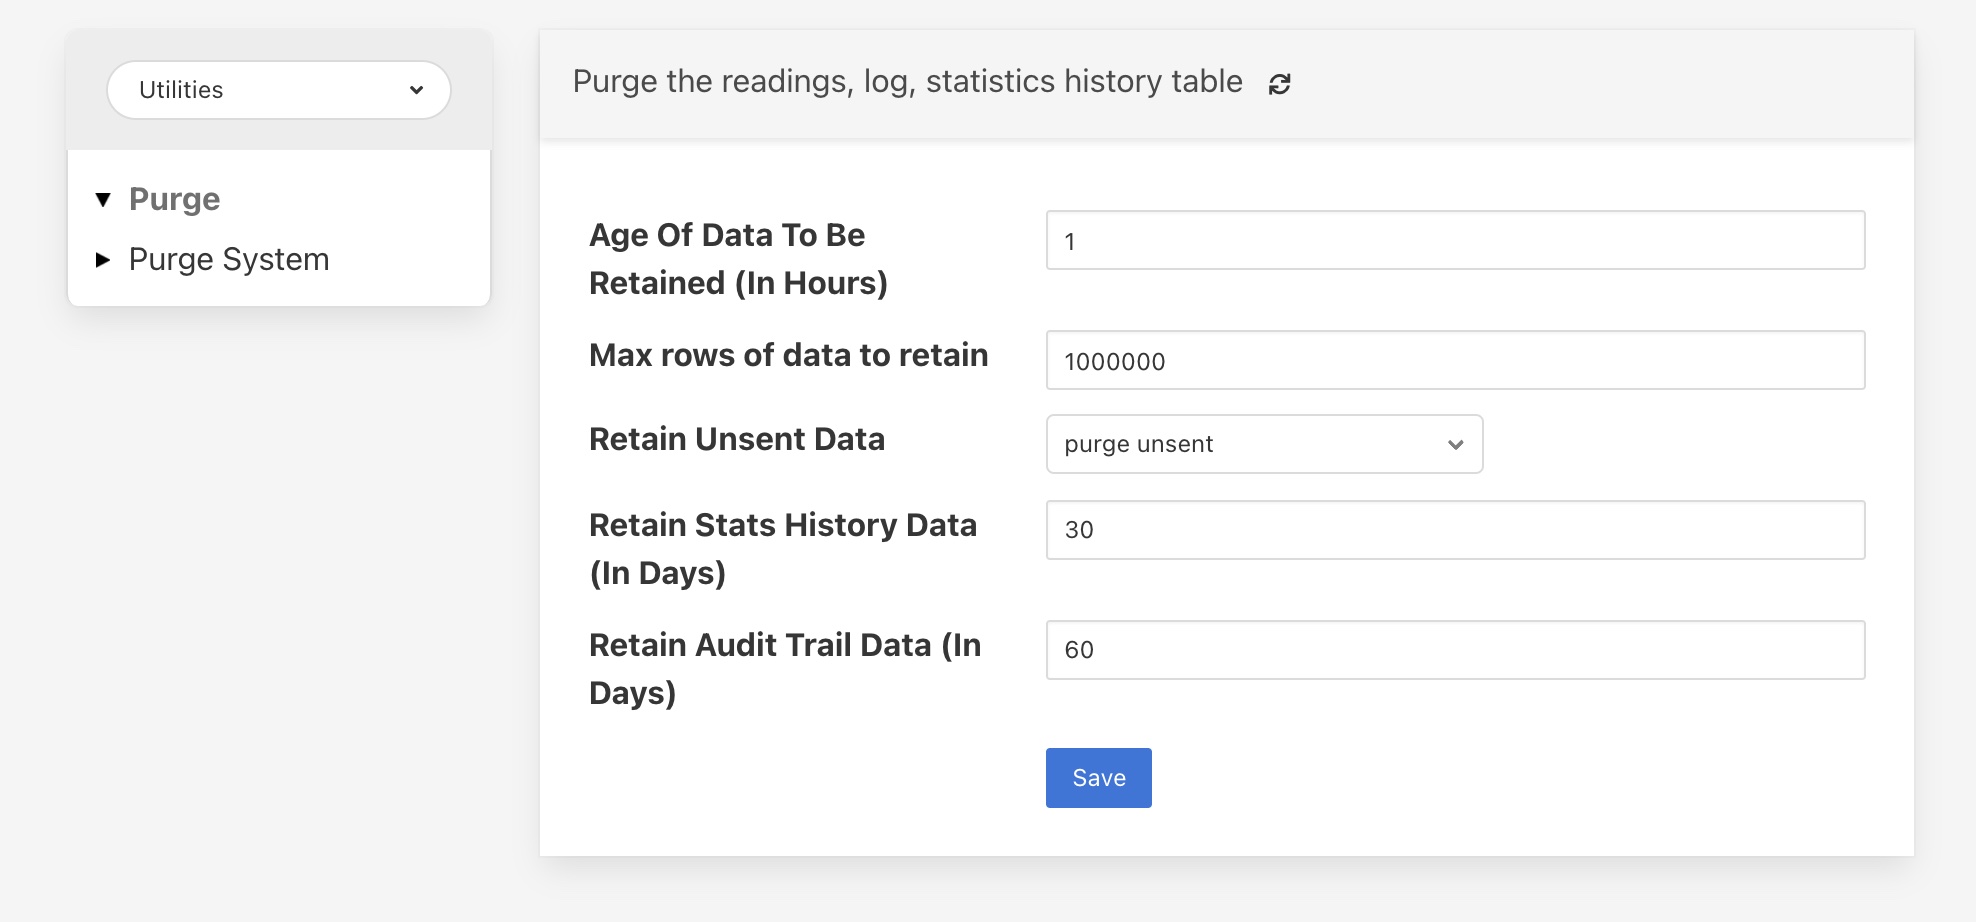
Age Of Data To Be Retained: This configuration option sets the limit on how old data has to be before it is considered for purging from the system. It defines a value in hours, and only data older than this is considered for purging from the system.
Max rows of data to retain: This defines how many readings should be retained in the buffer. This can override the age of data to retain and defines the maximum allowed number of readings that should be in the buffer after the purge process has completed.
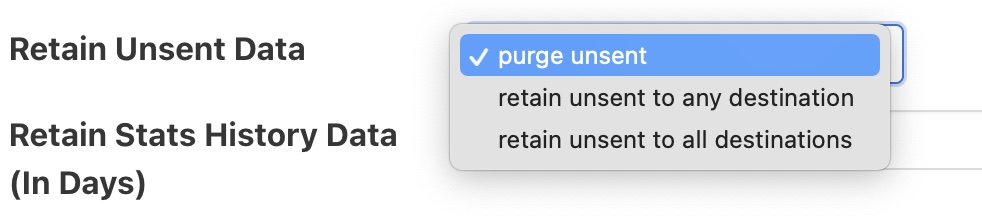
Retain Unsent Data: This defines how to treat data that has been read by FogLAMP but not yet sent onward to one or more of the north destinations for data. It supports a number of options
purge unsent: Data will be purged regardless if it has been sent onward from FogLAMP or not.
retain unsent to any destination: Data will not be purged, i.e. it will be retained, if it has not been sent to any of the north destinations. If it has been sent to at least one of the north destinations then it will be purged.
retain unset to all destinations: Data will be retained until it has been sent to all north destinations that are enabled at the time the purge process runs. Disabled north destinations are not included in order to prevent them from stopping all data from being purged.
Note: This configuration category will not appear until after the purge process has run for the first time. By default this will be 1 hour after the FogLAMP instance is started for the first time.
System Purge Task
The system purge task is run via a scheduled called system_purge, the default for this schedule is to run the system purge task every 23 hours and 50 minutes. This can be modified via the user interface in the Schedules menu entry or via the REST API by updating the schedule.
The configuration category for the system purge can be found in the Configuration menu item under the Utilities section.
|
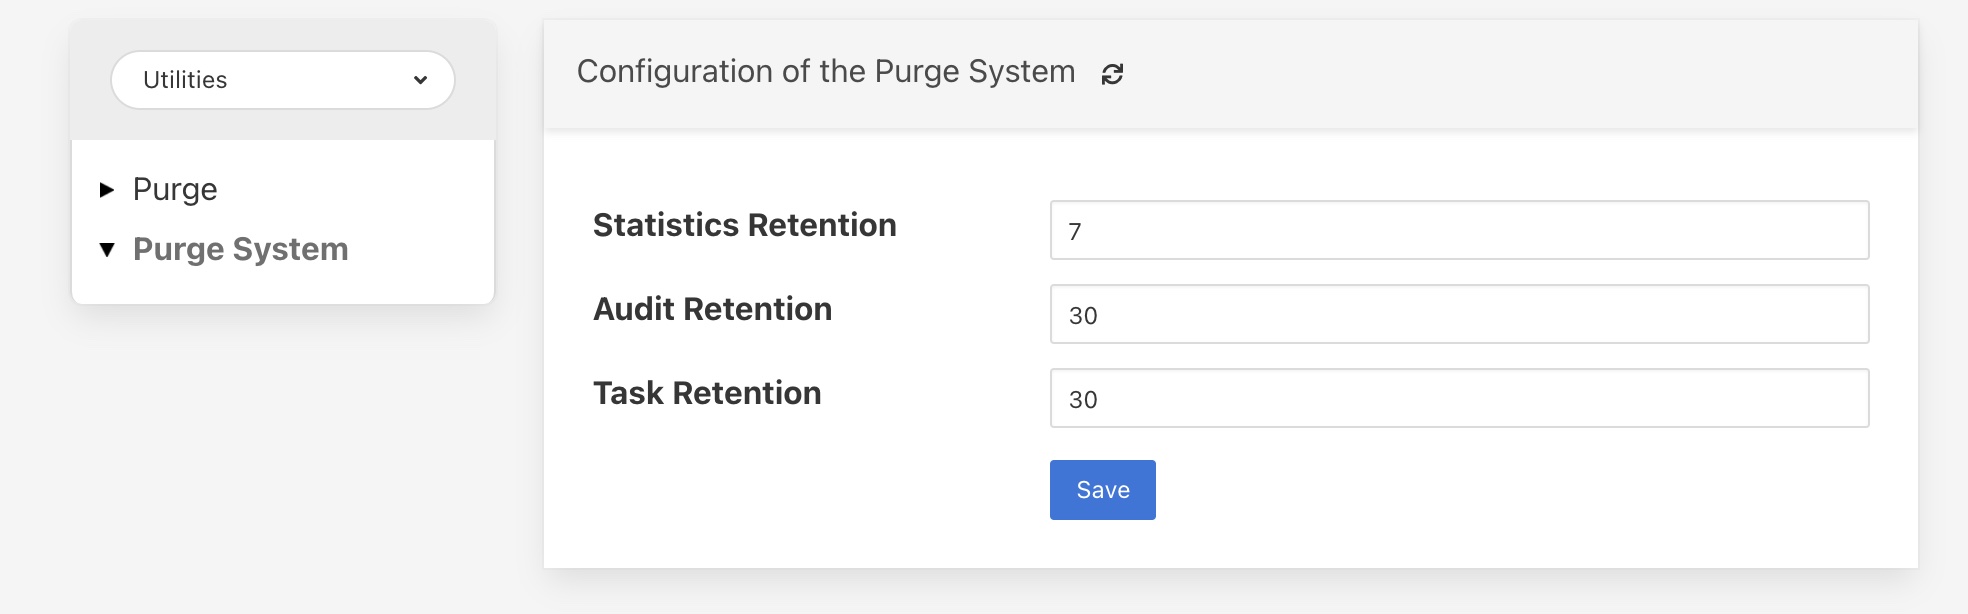
Statistics Retention: This defines the number of days for which full statistics are held within FogLAMP. Statistics older than this number of days are removed and only a summary of the statistics is held.
Audit Retention: This defines the number of day for which the audit log entries will be retained. Once the entries reach this age they will be removed from the system.
Task Retention: This defines the number of days for which history if task execution within FogLAMP is maintained.
Note: This configuration category will not appear until after the system purge process has run for the first time.