Person Detector Plugin
The foglamp-south-person-detector detects a person on a live video feed from either a camera or on a network stream. It uses Google’s Mobilenet SSD v2 to detect a person. The bounding boxes and confidence scores are displayed on the same video frame itself. Also FPS (frames per second) are also displayed on the same frame. The detection results are also converted into readings. The readings have mainly three things:
Count : The number of people detected.
Coordinates : It consists of coordinates (x,y) of top-left and bottom right corners of bounding box for each detected person.
Confidence : Confidence with which the model detected each person.
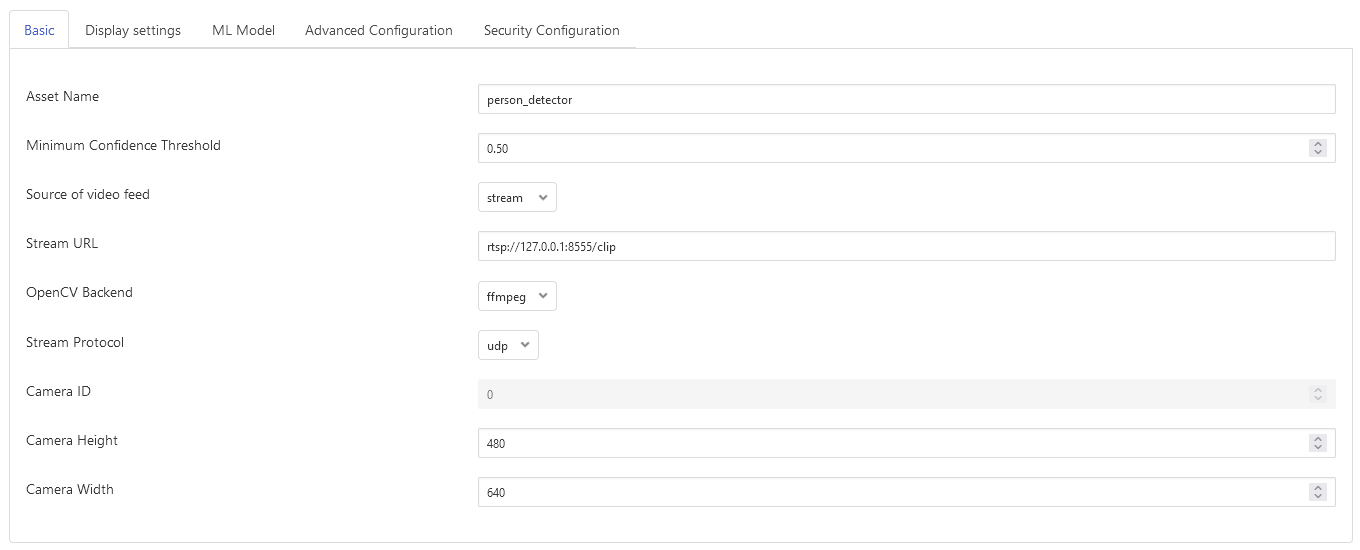
- Asset Name:
The name of the asset used for the readings generated by this plugin.
- Minimum Confidence Threshold:
The detection results from the model will be filtered out, if the score is below this value.
- Source:
Either use a stream over a network or use a local camera device. Default is set to stream.
- Streaming URL:
The URL of the RTSP stream, if stream is to be used. Only RTSP streams are supported for now.
- OpenCV Backend:
The backend required by OpenCV to process the stream, if stream is to be used. Default is set to ffmpeg.
- Streaming Protocol:
The protocol over which live frames are being transported over the network, if stream is to be used. Default is set to udp.
- Camera ID:
The number associated with your video device. See /dev in your filesystem you will see video0 or video1. It is required when source is set to camera. Default is set to 0.
- Camera Height:
The height of the canvas in which frame is to be displayed. Bounding box will be adjusted to this camera height. Default is 480.
- Camera Width:
The width of the canvas in which frame is to be displayed. Bounding box will be adjusted to this camera width. Default is 640.

- Enable Detection Window:
Show detection results in a native window. Default is set to disabled.
- Enable Web Streaming:
Whether to stream the detected results in a browser or not. Default is set to enabled.
- Web Streaming Port:
Port number where web streaming server should run, if web streaming is enabled. Default is set to 8085.

- TFlite model name:
This is the name of the tflite model as stored with Bucket service Its default value is “People”
- Model version:
Model version as stored with Bucket service Its default value is “1.2”
- Inference hardware:
Indicates whether to use CPU or TPU for inference. If you don’t want to use Coral Edge TPU then disable this configuration parameter. Also ensure to change the name of the model file to detect.tflite if disabled. Default is set to enabled.
The model file and the related files are uploaded as a single ‘tar.bz2’ file in bucket service.
- E.g. for CPU based inference, the bzip2-compressed tarball can be created using:
$ tar cjf model.tar.bz2 coco_labels.txt detect.tflite
Installation
First run requirements.sh
There are two ways to get the video feed.
- Camera
- To see the supported configuration of the camera run the following command.
Above example uses Camera ID 0 to indicate use of /dev/video0 device, please use the applicable value for your setup
Network RTSP stream
To create a network stream follow the following steps
Install vlc
$ sudo add-apt-repository ppa:videolan/master-daily
$ sudo apt update
$ apt show vlc
$ sudo apt install vlc qtwayland5
$ sudo apt install libavcodec-extra
Download some sample files from here.
$ git clone https://github.com/intel-iot-devkit/sample-videos.git
Either stream a file using the following
$ vlc <name_of_file>.mp4 --sout '#gather:transcode{vcodec=h264,vb=512,scale=Auto,width=640,height=480,acodec=none,scodec=none}:rtp{sdp=rtsp://<ip_of_machine_steaming>:8554/clip}' --no-sout-all --sout-keep --loop --no-sout-audio --sout-x264-profile=baselineNote : fill the <ip_of_the_machine> with ip of the machine which will be used to stream video. Also fill <name_of_file> with the name of mp4 file.
You can also stream from a camera using the following
$ vlc v4l2:///dev/video<index_of_video_device> --sout '#gather:transcode{vcodec=h264,vb=512,scale=Auto,width=<supported_width_of_camera_image>,height=<supported_height_of_camera_image>,acodec=none,scodec=none}:rtp{sdp=rtsp://<ip_of_the_machine>:8554/clip}' --no-sout-all --sout-keep --no-sout-audio --sout-x264-profile=baselineFill the following :
<index_of_video_device> The index with which you ran the v4l2 command mentioned above. for example video0.
<supported_height_of_camera_image> Height you get when you ran v4l2 command mentioned above. For example Discrete 640x480. Here 480 is height.
<supported_width_of_camera_image> Width you get when you ran v4l2 command mentioned above. For example Discrete 640x480. Here 640 is width.
<ip_of_the_machine> ip of the machine which will be used to stream video.
Once you have run the plugin by filling appropriate parameters Now go to your browser and enter ip_where_foglamp_is_running:the_port_for_web_streaming
FAQs
How to run this in virtual box installed in windows machine ?
Install virtual box extensions
cd c:\Program Files\Oracle\VirtualBox
VBoxManage list webcams
After obtaining the id of camera device run this
VboxManage controlvm “name_of_vm” webcam attach .id
Example:
VboxManage controlvm “new_ubuntu” webcam attach .1
- How many models are currently supported?
mobilenet_ssd_v1_coco_quant_postprocess_edgetpu.tflite (with Edge TPU), coco_labels.txt (labels_file)
mobilenet_ssd_v2_coco_quant_postprocess_edgetpu.tflite (with Edge TPU), coco_labels.txt (labels_file)
mobilenet_ssd_v2_face_quant_postprocess_edgetpu.tflite (with Edge TPU), coco_labels.txt (labels_file)
mobilenet_ssd_v1_coco_quant_postprocess.tflite (without Edge TPU), coco_labels.txt (labels_file)
mobilenet_ssd_v2_coco_quant_postprocess.tflite (without Edge TPU), coco_labels.txt (labels_file)
mobilenet_ssd_v2_face_quant_postprocess.tflite (without Edge TPU), coco_labels.txt (labels_file)
Download them from here https://github.com/google-coral/examples-camera/blob/master/download_models.sh
- Which cameras are supported?
Coral Camera
USB camera supporting MJPG format.
Raspberry pi camera.