OPC/UA Safe & Secure South Plugin
The foglamp-south-s2opcua plugin allows FogLAMP to connect to an OPC/UA server and subscribe to changes in the objects within the OPC/UA server. This plugin is very similar to the foglamp-south-opcua plugin but is implemented using a different underlying OPC/UA open source library, S2OPC safe & secure from Systerel. The major difference between the two is the ability of this plugin to support secure endpoints with the OPC/UA server.
A south service to collect OPC/UA data is created in the same way as any other south service in FogLAMP.
Use the South option in the left hand menu bar to display a list of your South services
Click on the + add icon at the top right of the page
Select the s2opcua plugin from the list of plugins you are provided with
Enter a name for your south service
Click on Next to configure the OPC/UA plugin
|
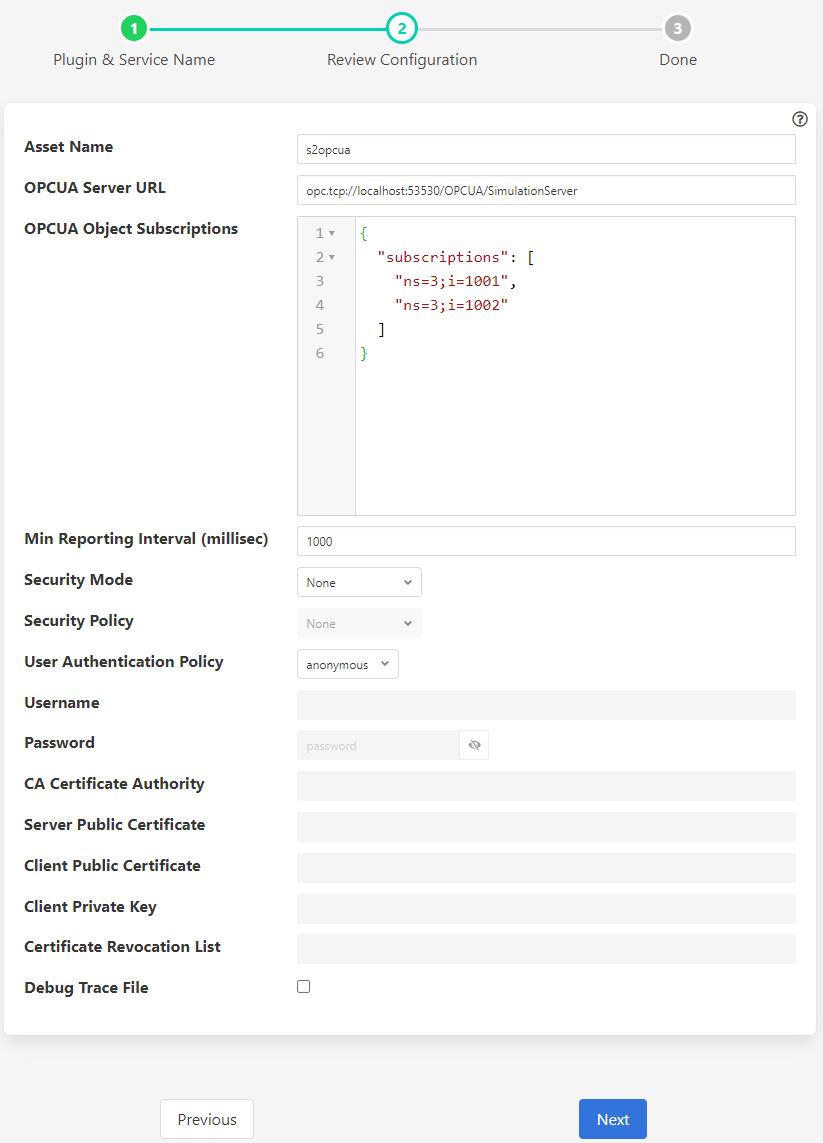
The configuration parameters that can be set on this page are;
Asset Name: This is a prefix that will be applied to all assets that are created by this plugin. The OPC/UA plugin creates a separate asset for each data item read from the OPC/UA server. This is done since the OPC/UA server will deliver changes to individual data items only. Combining these into a complex asset would result in assets that do only contain one of many data points in each update. This can cause upstream systems problems with the every changing asset structure.
OPCUA Server URL: This is the URL of the OPC/UA server from which data will be extracted. The URL should be of the form opc.tcp://…./
OPCUA Object Subscriptions: The subscriptions are a set of locations in the OPC/UA object hierarchy that defined which data is subscribed to in the server and hence what assets get created within FogLAMP. A fuller description of how to configure subscriptions is shown below.
Min Reporting Interval: This control the minimum interval between reports of data changes in subscriptions. It sets an upper limit to the rate that data will be ingested into the plugin and is expressed in milliseconds.
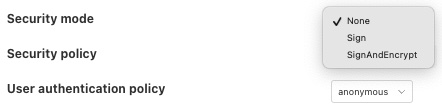
Security Mode: Specify the OPC/UA security mode that will be used to communicate with the OPC/UA server.
Security Policy: Specify the OPC/UA security policy that will be used to communicate with the OPC/UA server.
User Authentication Policy: Specify the user authentication policy that will be used when authenticating the connection to the OPC/UA server.
Username: Specify the username to use for authentication. This is only used if the User authentication policy is set to username.
Password: Specify the password to use for authentication. This is only used if the User authentication policy is set to username.
CA Certificate Authority: The name of the root certificate authorities certificate file in DER format. This is the certificate authority that forms the root of trust and signs the certificates that will be trusted. If using self-signed certificates this should be left blank.
Server Public Certificate: The name of the public certificate of the OPC/UA server specified in the OPCUA Server URL. This must be a DER format certificate file. It must be signed by the certificate authority unless you are using self-signed certificates.
Client Public Certificate: The name of the public certificate of the OPC/UA client application, that is, this plugin. This must be a DER format certificate file. It must be signed by the certificate authority unless you are using self-signed certificates.
Client Private Key: The name of the private key of the client application, that is, the private key the plugin will use. This must be a PEM format key file.
Certificate Revocation List: The name of the certificate authority’s Certificate Revocation List. This is a DER format certificate. If using self-signed certificates this should be left blank.
Debug Trace File: Enable the S2OPCUA OPCUA Toolkit trace file for debugging. If enabled, log files will appear in the directory /usr/local/foglamp/data/logs.


Subscriptions
Subscriptions to OPC/UA objects are stored as a JSON object that contents an array named “subscriptions.” This array is a set of OPC/UA nodes that will control the subscription to variables in the OPC/UA server. Each element in the array is an OPC/UA node id, if that node is is the id of a variable then that single variable will be added to the subscription list. If the node id is not a visible, then the plugin will recurse down the object tree below that node and add every variable in finds in this tree to the subscription list.
A subscription list which gives the root node of the OPC/UA server will cause all variables within the server to be added to the subscription list. Care however should be taken as this may be a large number of assets.
Subscription examples
{"subscriptions":["5:Simulation","2:MyLevel"]}
We subscribe to
5:Simulation is a node name under ObjectsNode in namespace 5
2:MyLevel is a variable under ObjectsNode in namespace 2
{"subscriptions":["5:Sinusoid1","2:MyLevel","5:Sawtooth1"]}
We subscribe to
5:Sinusoid1 and 5:Sawtooth1 are variables under ObjectsNode/Simulation in namespace 5
2:MyLevel is a variable under ObjectsNode in namespace 2
{"subscriptions":["2:Random.Double","2:Random.Boolean"]}
We subscribe to
Random.Double and Random.Boolean are variables under ObjectsNode/Demo both in namespace 2
Object names, variable names and namespace indices can be easily retrieved browsing the given OPC/UA server using OPC UA clients, such as Ua Expert.
Certificate Management
OPC UA clients and servers use X509 certificates to confirm each other’s identities and to enable digital signing and data encryption. Certificates are often issued by a Certificate Authority (CA) which means either the client or the server could reach out to the CA to confirm the validity of the certificate if it choses to.
The configuration described above uses the names of certificates that will be used by the plugin. These certificates must be loaded into the FogLAMP Certificate Store manually and named to match the names used in the configuration before the plugin is started. When entering certificate and key file names, do not include directory names or file extensions (.der or .pem).
Typically the Certificate Authorities certificate is retrieved and uploaded to the FogLAMP Certificate Store along with the certificate from the OPC/UA server that has been signed by that Certificate Authority. A public/private key pair must also be created for the plugin and signed by the Certificate Authority. These are uploaded to the FogLAMP Certificate Store.
OpenSSL may be used to generate and convert the keys and certificates required.
An generate_certs.sh example script to do this is available as part of the underlying S2OPC safe & secure library.
Certificate Requirements
Certificates must be X509 Version 3 certificates and must have the following field values:
Certificate Field |
Value |
|---|---|
Version |
V3 |
Subject |
This field must include a Common Name (CN=) which is a human-readable name such as S2OPCUA South Plugin. Do not use your device hostname. |
Subject Alternative Name |
URI= foglamp:south:s2opcua, DNS= deviceHostname |
Key Usage |
Digital Signature, Key Encipherment, Non Repudiation, Data Encipherment |
Extended Key Usage |
Client Authentication |
Self-Signed Certificates
A common configuration is to use self-signed certificates which are issued by your own systems and cannot be validated against a CA. For this to work, the OPC UA client and server must each have a copy of the other’s certificate in their Trusted Certificate stores. This task must be done by a system manager who is creating the device configuration. By copying certificates, the system manager is confirming that the client and server can legitimately communicate with each other.
Creating a Self-Signed Certificate
There is a very useful online tool for creating self-signed certificates called CertificateTools. You can watch a demonstration of CertificateTools on YouTube. This section will walk you through the necessary steps to create a self-signed certificate for the S2OPCUA South plugin which is the OPC UA Client.
The CertificateTools main page is divided into sections. You can leave many of the sections at their default values. Here are the required entries for each section:
Private Key
Leave the default values as-is: Generate PKCS#8 RSA Private Key and 2048 Bit. Leave Encrypt unchecked.
Subject Attributes
In Common Names, enter a human-readable name such as S2OPCUA South Plugin. Click Add.
Edit Country, State, Locality and Organization as you wish. We recommend:
Country: US
State: CA
Locality: Menlo Park
Organization: Dianomic
Subject Alternative Name
Set the drop-down to DNS. Enter the hostname of your FogLAMP device. This can be an unqualified name, that is, the device hostname without domain name. Click Add.
Set the drop-down to URI. Enter foglamp:south:s2opcua. Click Add.
x509v3 Extensions
Key Usage
Click the check boxes to enable Critical, Digital Signature, Key Encipherment, Non Repudiation and Data Encipherment.
Extended Key Usage
Click the check boxes to enable Critical and TLS Web Client Authentication.
Encoding Options
Leave at Default.
CSR Options
Leave the first drop-down at SHA256. Change the second drop-down from CSR Only to Self-Sign. Doing this will expose drop-downs to set the self-signed certificate expiration time.
Generating the Certificate and Private Key
Click Submit. This will create a new section marked by a blue bar labelled Certificate 0.
Open Certificate 0. This will reveal a subsection called Download. You will need only two of these files:
PEM Certificate (filename cert.crt)
PKCS#12 Certificate and Key (filename cert.pfx)
When you click the PKCS#12 Certificate and Key link, you will be prompted for a password for the private key. It is acceptable to click Cancel to proceed without a password. Download these two files to a working directory on any computer with OpenSSL installed (you will need OpenSSL to post-process the downloaded files). You do not need to do this on your FogLAMP device. You must do this on a machine that can run the FogLAMP GUI in a browser; you will need the browser to import the certificate and key into the FogLAMP Certificate Store.
Note
The CertificateTools webpage can show you the equivalent OpenSSL commands to perform the self-signed certificate and key generation. Look for OpenSSL Commands below the blue Certificate 0 bar.
Post-Processing the Certificate and Private Key
Use the OpenSSL command-line utility to convert the certificate and key files to the formats needed for the S2OPCUA South Plugin.
Converting the Certificate File
The PEM Certificate file (cert.crt) is in PEM format. It must be converted to DER format. The command is:
openssl x509 -inform pem -outform der -in cert.crt -out myclientcert.der
Converting the Private Key File
The PKCS#12 Certificate and Key file (cert.pfx) is in Public-Key Cryptography Standards PKCS#12 format. It must be converted to PEM format. The command is:
openssl pkcs12 -in cert.pfx -out myclientkey.pem -nodes
This command will prompt for the Import Password. If you created a password when you downloaded the PKCS#12 Certificate and Key file, enter it now. If you did not create a password, hit Enter.
Importing the Certificate and Key Files
Launch the FogLAMP GUI. Navigate to the Certificate Store. In the upper right corner of the screen, click Import.
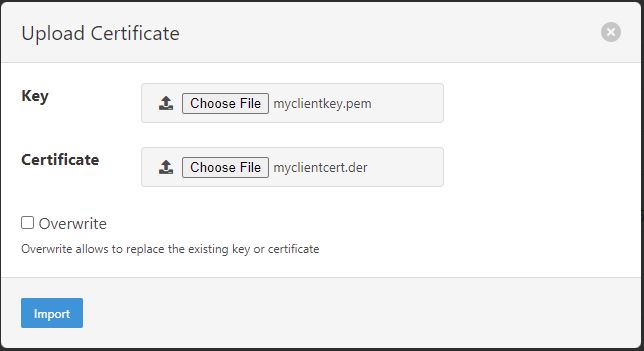
In the Key section, click Choose File and navigate to the location of the key file myclientkey.pem.
In the Certificate section, click Choose File and navigate to the location of the certificate file myclientcert.der.
Click Import.
You should use the Certificate Store in the FogLAMP GUI to import your OPC UA server certificate. In this case, enter the server certificate file name in the Certificate portion of the Import dialog and then click Import.