North HTTP-C
The foglamp-north-http-c plugin allows data to be sent from the north of one FogLAMP instance into the south of another FogLAMP instance. It allows hierarchies of FogLAMP instances to be built. The FogLAMP to which the data is sent must run the corresponding South service in order for data to flow between the two FogLAMP instances. The plugin supports both HTTP and HTTPS transport protocols and sends a JSON payload of reading data in the internal FogLAMP format.
Additionally this plugin allows for two URL’s to be configured, a primary URL and a secondary URL. If the connection to the primary URL fails then the plugin will switch over to using the secondary URL. It will switch back if the connection to the secondary fails or if when the north task completes and a new north task is later run.
The plugin may also be used to send data from FogLAMP to another system, the receiving system should implement a REST end point that will accept a POST request containing JSON data. The format of the JSON payload is described below. The required REST endpoint path is defined in the configuration of the plugin.
Filters may be applied to the connection in either the north task that loads this plugin or the receiving south service on the up stream FogLAMP.
A Python version plugin exists also that performs the same function as this plugin, the pair are provided for purposes of comparison and the user may choose whichever they prefer to use.
To create a north task to send to another FogLAMP you should first create the South service that will receive the data. Then create a new north tasks by;
Selecting North from the left hand menu bar.
Click on the + icon in the top left
Choose httpc from the plugin selection list
Name your task
Click on Next
Configure the HTTP-C plugin
The configuration is split across as set of tabs, each of which contains related information
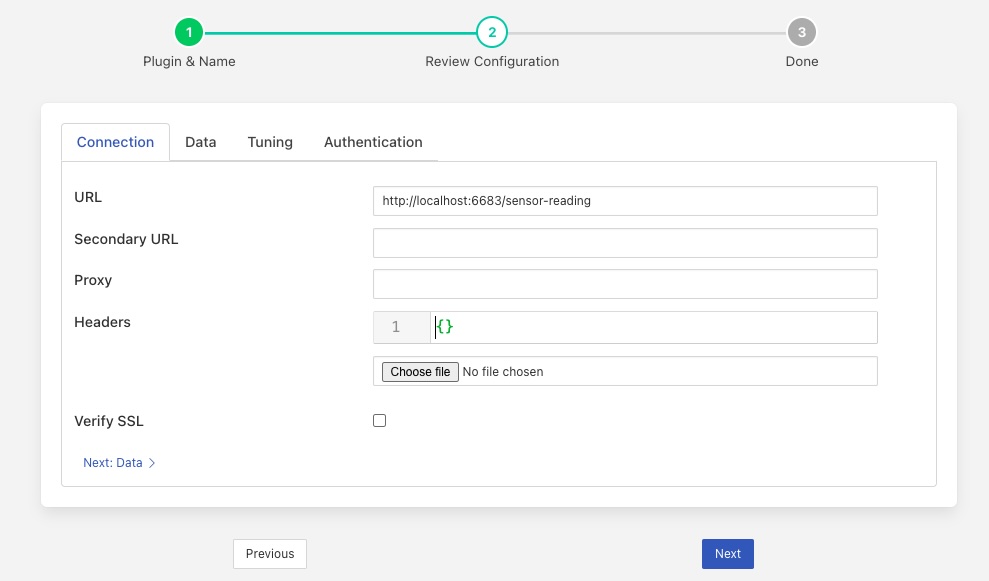
Connection
The basic connection information used to define the destination HTTP service.
URL: The URL of the receiving South service, the address and port should match the service in the up stream FogLAMP. The URL can specify either HTTP or HTTPS protocols.
Secondary URL: The URL to fail-over to if the connection to the primary URL fails. If fail-over is not required then leave this field empty.
Proxy: The host and port of the proxy server to use. Leave empty is a proxy is not in use. This should be formatted as an address followed by a colon and then the port or a hostname followed by a colon and then the port. E.g. 192.168.0.42:8080. If the default port is used then the port may be omitted.
Headers: An optional set of header fields to send in every request. The headers are defined as a JSON document with the name of each item in the document as header field name and the value the value of the header field.
Verify SSL: When HTTPS rather the HTTP is used this toggle allows for the verification of the certificate that is used. If a self signed certificate is used then this should not be enabled.
Data
A set of configuration items that relate to the source of the data to send and any optional processing to apply to that data.
|
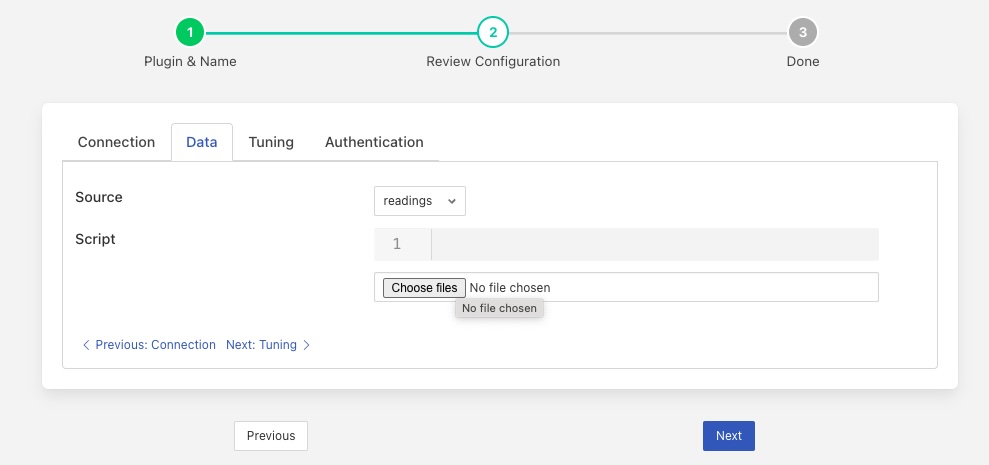
Source: The data to send, this may be either the reading data or the statistics data
Script: An optional Python script that can be used to convert the payload format. If given the script should contain a method called convert that will be passed a single reading as a JSON DICT and must return the new payload as a string.
Tuning
Various connection parameters can be tuned to cater for network conditions.
|
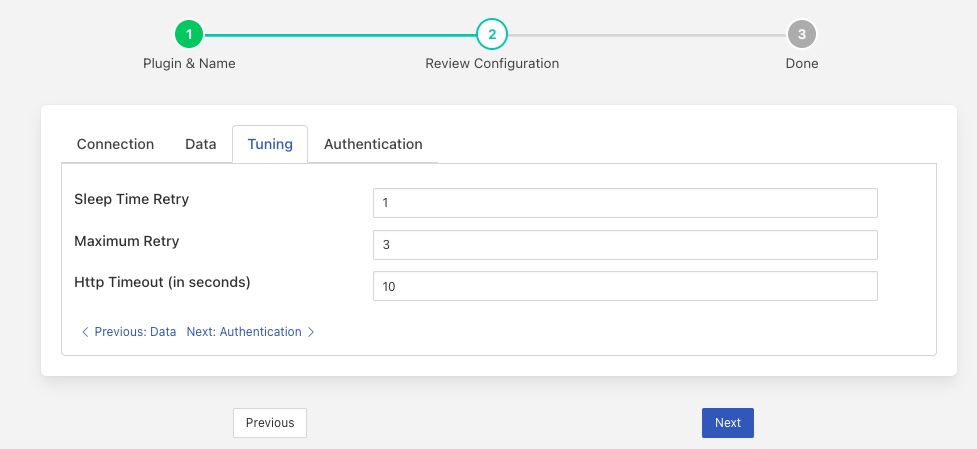
Sleep Time Retry: A tuning parameter used to control how often a connection is retried to the up stream FogLAMP if it is not available. On every retry the time will be doubled.
Maximum Retry: The maximum number of retries to make a connection to the up stream FogLAMP. When this number is reached the current execution of the task is suspended until the next scheduled run.
Http Timeout (in seconds): The timeout to set on the HTTP connection after which the connection will be closed. This can be used to tune the response of the system when communication links are unreliable.
Authentication
The plugin supports optional basic HTTP authentication, leave these entries blank if authentication is not required.
|
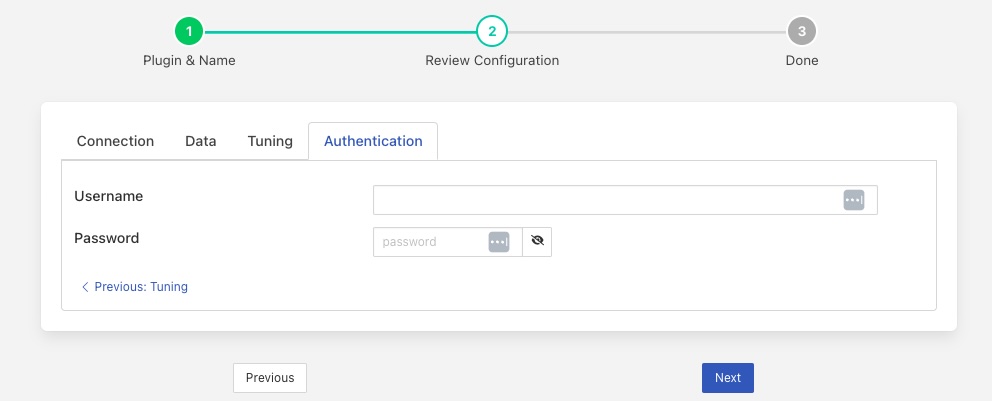
Username: The username that will be used to create the HTTP basic authentication request.
Password: The password that will be used to create the HTTP basic authentication request.
Click Next
Enable your task and click Done
Header Fields
Header fields can be defined if required using the Headers configuration item. This is a JSON document that defines a set of key/value pairs for each header field. For example if a header field token was required with the value of sfe93rjfk93rj then the Headers JSON document would be as follows
{
    "token" : "sfe93rjfk93rj"
}
Multiple header fields may be set by specifying multiple key/value pairs in the JSON document.
JSON Payload
The payload that is sent by this plugin is a simple JSON presentation of a set of reading values. A JSON array is sent with one or more reading objects contained within it. Each reading object consists of a timestamp, an asset name and a set of data points within that asset. The data points are represented as name value pair JSON properties within the reading property.
The fixed part of every reading contains the following
Name |
Description |
|---|---|
ts |
The timestamp as an ASCII string in ISO 8601 extended format. If no time zone information is given it is assumed to indicate the use of UTC. This timestamp is added by FogLAMP when it first reads the data. |
user_ts |
The timestamp as an ASCII string in ISO 8601 extended format. If no time zone information is given it is assumed to indicate the use of UTC. This timestamp is added by the device itself and can be used to reflect the timestamp the data refers to rather than the timestamp FogLAMP read the data. |
asset |
The name of the asset this reading represents. |
readings |
A JSON object that contains the data points for this asset. |
The content of the readings object is a set of JSON properties, each of which represents a data value. The type of these values may be integer, floating point, string, a JSON object or an array of floating point numbers.
A property
"voltage" : 239.4
would represent a numeric data value for the item voltage within the asset. Whereas
"voltageUnit" : "volts"
Is string data for that same asset. Other data may be presented as arrays
"acceleration" : [ 0.4, 0.8, 1.0 ]
would represent acceleration with the three components of the vector, x, y, and z. This may also be represented as an object
"acceleration" : { "X" : 0.4, "Y" : 0.8, "Z" : 1.0 }
both are valid formats within FogLAMP.
An example payload with a single reading would be as shown below
 [
    {
        "user_ts"   : "2020-07-08 16:16:07.263657+00:00",
        "ts"        : "2020-07-08 16:16:07.263657+00:00",
        "asset"     : "motor1",
        "readings"  : {
                      "voltage"  : 239.4,
                      "current"  : 1003,
                      "rpm"      : 120147
                      }
    }
]
Payload Script
If a script is given then it must provide a method called convert, that method is passed a single reading as a Python DICT and must return a formatted string payload for that reading.
As a simple example lets assume we want a JSON payload to be sent, but we want to use different keys to those in the default reading payload. We will replaces readings with data, user_ts with when and asset with device. A simple Python script to do this would be as follows;
import json
def convert(reading):
    newReading = {
       "data" : reading["readings"],
       "when" : reading["user_ts"],
       "device" : reading["asset"],
    }
    return json.dumps(newReading)
An HTTP request would be sent with one reading per request and that reading would be formatted as a JSON payload of the format
{
    "data":
    {
        "sinusoid": 0.0,
        "sine10": 10.0
    },
     "when": "2022-02-16 15:12:55.196494+00:00",
     "device": "sinusoid"
}
Note that white space and newlines have been added to improve the readability of the payload.
The above example returns a JSON format payload, the return may however not be encoded as JSON, for example an XML payload
from dict2xml import dict2xml
def convert(reading):
    newReading = {
       "data" : reading["readings"],
       "when" : reading["user_ts"],
       "device" : reading["asset"],
    }
    payload = "<reading>" + dict2xml(newReading) + "</reading>"
    return payload
This return XML format data as follows
<reading>
   <data>
     <sine10>10.0</sine10>
     <sinusoid>0.0</sinusoid>
   </data>
   <device>sinusoid</device>
   <when>2022-02-16 15:12:55.196494+00:00</when>
 </reading>
Note that white space and formatting have been added for ease of reading the XML data. You must also make sure you have installed the Python XML support as this is not normally installed with FogLAMP, To do this run
pip3 install dict2xml
from the command line of the FogLAMP machine.
Upstream Integration
The ability to execute a script on the payload sent make this an ideal plugin to be used to integrate with upstream systems that have a REST API for ingesting data. In some cases scripts will be required in the plugin side in order to achieve that interface, although it may also be the case that the receiving system is a more convenient place to execute the code required to ingest the data from FogLAMP. Once such example in the Ignition platform.
Ignition Integration
Ignition has a set of modules that may be loaded and provide capability for integration into Ignition. In particular it has an interface that allows for REST calls to be made to access Ignition, the WebDev module. This can be used allow FogLAMP to send data into Ignition systems and store data in tags within the Ignition Historian.
The first step in the process is to create a REST endpoint in the Ignition WebDev module.
In the Ignition Designer, open your Ignition project and go to the WebDev item in the Project Browser. Right click on the WebDev entry
Create a New Folder and name it. Folder creation is optional but useful for group entry points. The folder name will appear in the URL of the end point that is created.
Once you have created your new folder, right click on the folder and select New Python Resource. This will create the endpoint for your REST call. Name the Python resource, this name is the final component of the URL of your REST endpoint.
Select the required REST operation. In this case we need to write a doPost method.
You will be presented with a window in which you can write some code in Python.
We can use the standard HTTP north plugin to write readings to the Ignition WebDev endpoint that we create and then in that end point we can take the data out of the readings and write them to Ignition historian tags. We can also create the tags within the Ignition historian if they do not exist.
def doPost(request, session):
   tagBase = '[Sample_Tags]'
   data = request['postData']
   for index in range(len(data)):
       readings = data[index]['readings']
       asset = data[index]['asset']
       writeTags = []
       writeData = []
       for dp in readings:
           tag = tagBase + asset + "/" + dp
           writeTags.append(tag)
           writeData.append(readings[dp])
           if not system.tag.exists(tag):
               tp = "Float8"
               if type(readings[dp]) == str:
                   tp = "String"
               elif type(readings[dp]) == int:
                   tp = "Int8"
               tagDef = {
                   "name" : dp,
                   "dataType" : tp,
                   "valueSource" : "memory"
               }
               system.tag.configure(tagBase + asset, [ tagDef ], "a")
       ret = system.tag.writeBlocking(writeTags, writeData)
   return {'json': {'result': str(len(data))}}
The asset name becomes a tag folder in the Ignition historian, we have hard coded the base location in which tags are created and each data point within the asset becomes a tag.
Note
We set the type of the tag by examining the data. This is slightly risky as if the data is numeric we might receive a value that appears to be an integer but at later stages it becomes a floating point value.